In March of 2018 I posted a Wired Tabletop article detailing my use of a Raspberry Pi 3B (RP3) to display the Roll20 virtual tabletop. That build was successful and after a few tweaks it became my go to source to display the game for my players.
My weekly game group consists of 5 local players and at least one remote player. Roll20 does an excellent job because I can share the tabletop with my remote player but display it on a television for the local group.
Since March I have been using either my Ipad Air 2 or my Macbook Pro to manage the game as DM. Both devices worked exceptionally well although the ability to shift+click meant I was setting up the Macbook behind my DM shield. The space was crowded though and more than once a would catch someone peeking at the screen. Those players were shamed before the group and polymorphed into dung beetles.
Up to this point I had only used the RP3 to display the Roll20 tabletop. I didn’t use it to run the game. I considered adding a touchscreen and build a second RP3 to use as the DM but held off. At the time I was considering purchasing an Intel Skull Canyon NUC and use that to run games but that build would set me back about $2,000. I was hesitant to invest that much.
Then I heard Raspberry Pi was coming out with a new model, the Raspberry Pi 3B+ (RP3+)!
Initially I wasn’t sure if the RP3+ would be worth it. A few of the new features wouldn’t benefit me. I didn’t need PoE (power over ethernet) or gigabit eithernet for example. The processor remained the same on the RP3+ as the RP3 as did the amount of RAM.
Two things did catch my eye. The processor speed was increased to 1.4 MHz, up from 1.2 MHz and the RP3+ had 5 Ghz wifi build in.
I waited for the new board to be out for a while and then started checking on reviews and comparison videos. There did appear to be a slight, but noticeable, performance improvement on the RP3+.
My tech guru, and webmaster of EvolvingRPG, Nexeh helped me out with some suggestions and before I knew it I had a brand new RP3+ with a spiffy case.
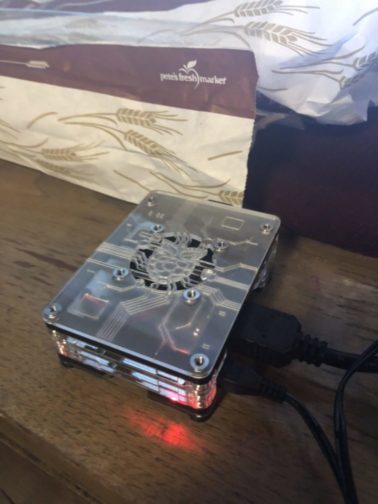
Raspberry Pi 3B+
This new build cost me about $30 for the RP3+ and $25 for the C4Labs Black Mist case for the Pi. I already had a 32gb SD card with Raspian and a power source. The new case also came with a fan which I prefer to keep the RP3+ cool as it typically runs for several hours at a time.
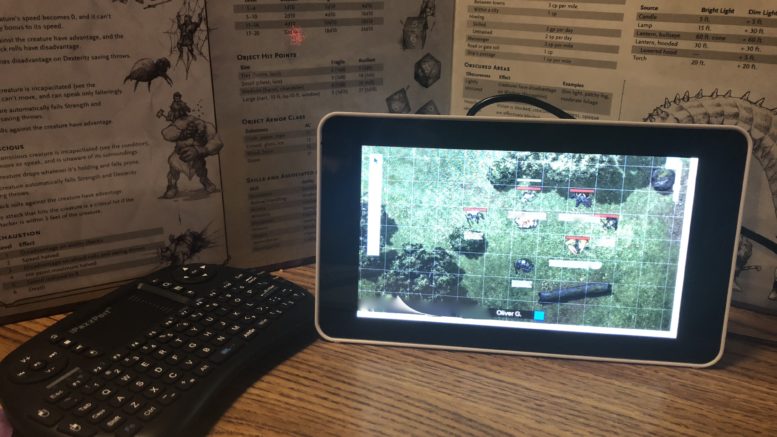
Everything was great for the players but I still needed to tackle my space problem on my side of the DM screen. I had considered the 7″ touchscreens that were available for Raspberry Pi’s but had been hesitant until Nexeh again helped out. He had a 7″ touchscreen hooked up to a RP3 he was using at home.
The Raspberry Pi 7″ touchscreen was surprisingly responsive. For a piece of equipment that retails for about $60 it works well. After trying out Nexeh’s I went out and purchased everything I would need for my next project.
I picked up the 7″ touchscreen, the case, a RP3+, power source and 32gig SD card for about $120 all together. It was a simply assembly process. I purchased the official Raspberry Pi touchscreen which had the video adapter board already mounted to it. The case fit both the touchscreen and RP3+ snuggly. There isn’t much room to spare but it all fits properly.
I had two extra heatsinks that I mounted on the processor and the RAM chip to help cool the board. I was concerned that the touchscreen didn’t have a built in fan or mounts to add one. The back is easily removable to allow access to the RP3+ (and lets you mount the unit to a wall if you want) so I figured if I ran into a thermal throttling issue I could open the back up and improve air flow. Back in March I ran into issues with thermal throttling but was able work that out.
The initial boot of the new build went well. The only problem is that the display can’t sense the orientation of the case and as a result it is upside down. The touchscreen only fits one way so you need to change the screen display in the config file.
I found several sources that provided instructions on how to do this and a line of code later the display was booting in the proper orientation.

Raspberry Pi 3B+ 7″ Touchscreen
The Raspberry Pi 7″ touchscreen is only about half as tall as the DM Screen so it provides me with more privacy while freeing up a lot of space. I use a wireless keyboard/mouse to manage the game. This gives me all of the functionality I need to ping, gauge distances, and center the player’s screen where I want it during play.
The RP3+ does get hot in the case but I have not run into any thermal throttling. I disabled hardware acceleration in Chromium just like Nexeh suggested back in March. With the hardware acceleration enabled the RP3+ runs into similar heat problems and high CPU usage.
The major downside to the small screen footprint is the limited room to show stats and other information. I don’t have a lot of room to view the character sheets for NPCs and monsters. I have to rely on notes or physical stat sheets but I can deal with that. The build accomplishes the objective I had. I wanted a small but versatile screen to control my Roll20 games and the RP3+ delivered.
All in all I am very pleased with how the Raspberry Pi’s have been handling my games. I’ve run D&D and Starfinder using the RP3 and the new RP3+. These little computers never fail to amaze me. The build costs are reasonable and there is a wealth of support online to tackle any problems.
If you have any questions about this build or would like to share your own tech related roleplaying store please comment below.
I hope you enjoyed this post. If you did I would encourage you to check out our other articles and podcasts.
Oliver Greytome
@olivergreytome
Be the first to comment on "Wired Tabletop Raspberry Pi 3B+"